Chain Replacement And Repair
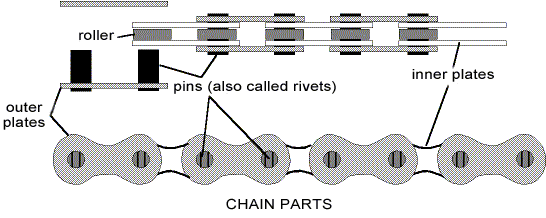
Here we explain how to replace a chain on a derailleur-equipped bicycle so that you can install a new chain when yours wears out. Bicycles with derailleurs use a chain that  normally cannot be removed unless you separate one link with a chain tool (photo, left), a special bicycle tool that lets you push a pin out of the chain (more about this procedure later).
The techniques used to replace a chain will also help you repair one should you or a riding companion have a problem on the road or trail. For example, as long as you carry a chain tool, it's a fairly simple matter to repair something as serious as a broken chain, which would otherwise leave you stranded.
How do you know when to replace a chain?
You can purchase the Park Tool Chain Checker and use it, or you can measure the chain for wear. On a new chain you'll be able to measure exactly 12 inches between 2 chain pins. If the distance measures 12 1/8 inches or more, your chain is worn out and should be replaced.
It's important to check your chain every few months and replace it before it's too far gone. If you just keep riding, you'll wear the chain, cassette and even the chainrings. When you replace your chain regularly, your other drivetrain components will last a lot longer, which saves you money. You'll also enjoy smoother shifting and pedaling if you always keep a good chain on your bike.
Note that if you wait too long you'll probably need at least a new cassette to go with your new chain, and perhaps a new chainring. You'll know this is the case because when you ride your bike with the new chain you'll experience a skipping sensation while pedaling. This skipping is caused by the new chain slipping on worn cogs. Skipping is dangerous and you should replace the cassette immediately.
Recommended Tools and Parts:
- Park Tool Chain Checker Tool or a ruler
- chain (must be compatible with your bicycle; for example 9-speed for a 9-speed cassette)
- chain tool compatible with your chain type (we recommend carrying one with you on rides, too)
- special replacement pin or link for your chain (supplied with the new chain)
- pliers
- rubber gloves
- it's also helpful to have a repair stand, which lets you work on the bike at a comfortable height and makes it easy to pedal by hand to check for any tight links or problems after you've installed the new chain
Chain Types
There are 3 types of chains named and described below. Though there are similarities, each type requires a slightly different technique for replacement. You can click the links below to jump to that type of chain or you may want to read about all of them so you'll be able to replace/repair any chain. That way, if you carry a chain tool on rides, you'll be able to rescue your friends if theirs break. Here are the chain types:
Type 1. Chain joined with special replacement pin
On this chain a special pin is inserted that takes the place of a stock pin. This is the way modern Shimano and Campagnolo chains work. The special replacement pin (sometimes 2) is supplied with the new chain so look for it and don't lose it when you open the package.
Type 2. Chain joined with special connecting link (sometimes called a "master" link)
Here the chain is joined by a special link that has 2 outer plates with protruding pins that are inserted into the chain rollers, aligned to fit together and then snapped tight by pushing on the pedals. The special connecting link is supplied with the new chain. Look for it in the package.
Type 3. Chain joined by any pin
The traditional method of joining a chain is to push any pin out just far enough to be able to flex the chain to separate the ends. Though most chains today use the special pins or link, this is still a good thing to understand, because you can use this approach to get home should you break a chain and not have a replacement pin or link for the repair (you should repair the chain correctly when you get home).
Purchasing And Sizing The Chain
Once you realize you need a new chain and you're ready to stop riding long enough to replace it,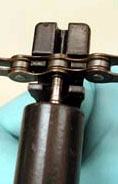 use your chain tool to push any pin completely out of the chain. Chain tools differ. If yours has two grooves for holding your chain be sure to rest the chain so that you're pushing against the sturdier one, which is usually at the back of the tool (photo, right). This is important, because if you seat the chain on the middle groove and try to drive out the pin, you may break that part of the tool.
Once the pin is extracted, you can take the chain off the bike. At this point you can count each link to determine how many are on your chain. Or, you might choose to simply bring the chain in to us and let us do the math. Either way, your new chain has to be the same length as your old in order to work correctly on your bicycle. Plus, it must be compatible with your drivetrain. For example, a 9-speed chain should be used with a 9-speed drivetrain, a 10-speed with a 10-speed, and so on. If you have any questions about chain compatibility, just ask. In general it's best to use the same type of chain you had before.
When you have a new chain correctly sized for your bicycle, you're ready to begin installation. First, route it through the rear derailleur by passing it beneath the lower pulley and up around the right side of the top pulley and then back, around and over the cassette. Be sure the chain isn't resting on anything but the pulleys and that it forms a backwards S where it passes through the pulleys (photos, below: notice that in the one marked "wrong," the chain is dragging on the metal cage).

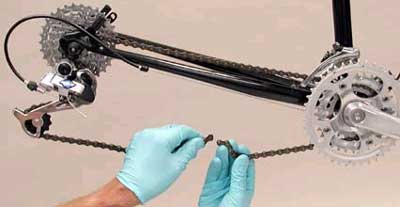
Next, pull the chain through the front derailleur cage and around the bottom bracket (don't place it on the small chainring yet). You should end up with the chain looking like the one in the picture below (with the exception that the chain is resting on the frame, not on a chainring):
Joining The Chain
When installing or repairing a chain that uses a special replacement pin, or a chain that uses any pin, keep in mind that most chain failure is due to one of the pins being improperly installed. Modern chains are very narrow, and even a small amount of misalignment in the pin where it sits in the outer plate could cause the chain to break under load. So, always carefully compare the pin you installed to its neighbors making sure they protrude equal amounts.
It is possible to use a special connecting link instead of the replacement pin should you decide you'd rather not deal with pressing pins in and out. You'll just need to get one that's compatible with your chain type and size. Tip: If you carry a couple special connecting links in your seat bag you'll be able to repair a broken chain quickly and easily.
Here are how the 3 chain types are joined:
Type 1: Special replacement pins
Some chains, including Shimano, use chain pins which are peened to create a mushroom effect at the ends of the pins, which adds strength where they meet the outer plates. When a pin is pressed even partially out, this peening is sheered off on the side pressed by the chain tool. If this pin is reused, it will create a weak link at that pin, which could lead to chain breakage.
To prevent this weakness Shimano and some Campagnolo chains use special replacement pins when the chain is installed new or when one is removed and re-installed. These replacement pins have pilots that allow installation without damage to the pin or the outer plate. The pilot is then broken off or removed before riding. These pins come with the chains along with instructions for their use. Tip: It's a good idea to carry a spare pin for roadside repairs.
Shimano Chain Installation
Align the ends of the chain and insert the special replacement pin into the holes, tapered end first.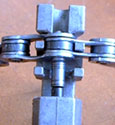 The pin will protrude out, towards you. Now place the chain tool on the chain so that the link you're working on is seated completely and resting against the back (strongest) shelf of the tool with the tool's pin aligned to press directly on the special replacement pin when you turn the tool's handle (photo, right).
Drive the replacement pin into the chain (this will push the pilot part of the pin out the other side). To make sure you don't push the pin too far, stop and check your progress a few times as you turn the tool. Stop pushing the pin with the tool when the pin end you're pushing on protrudes the same amount as the neighboring pins.
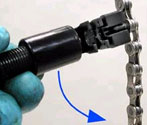 To finish installing the pin, break off the pilot, which will snap off if you grab it with pliers and bend. On some chain tools, you can also slip it into the head of the tool and twist to snap it off (photo, left).
Now that the chain is joined, check the connection for a tight link. It should pivot at the roller without resistance. If it binds, it may cause skipping and shifting problems. To free a stiff link, grasp the chain with your hands straddling the stiff link and flex the chain laterally, which will free the outer plates that got pinched during pin installation causing the stiff link.
When the new chain is joined correctly you'll be able to spin the pedal backwards by hand and watch the chain run smoothly around the derailleur pulleys.
Campagnolo 10-Speed Chain Installation
Campagnolo 10-speed chains use a special replacement pin, too. It's comprised of 2 parts, the pin and the pilot. Engage the pilot and pin (one end of the pin will fit onto the peg on the pilot) so that the pin faces the inside of the bike, toward the spokes (photo, right) and the pilot is inside the link. The pin is then pushed outward, away from the spokes until it's fully inserted in the link.
The reason the pin is inserted from the spokes side is because it reduces the chance of the pin striking the derailleur cage and compromising shifting, which could happen if you pushed it in from the other side.
Campagnolo makes a special tool for installing the 10-speed chain. If you don't have this tool, it's especially important to press down on the chain at the pin to keep it seated i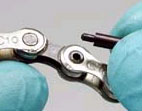 n the chain tool. Use your thumb to hold the link in place as you insert it.
After the pin is fully inserted, simply pull outward to remove the pilot (photo). Check the freshly connected link by flexing it to feel for tightness that may cause shifting problems. The link should pivot as freely as the others. If not, grasp the chain with your hands straddling the tight link and gently flex laterally to free the link.
Type 2: Special connecting link
Some chain manufacturers offer a special link (sometimes called a "master link"), to join the chain. Because designs vary, be sure to read the directions or ask us. Typically, the bicycle chain ends must have rollers on each end. In other words, neither chain end has an outer plate with a pin.
The special link comes in two pieces (photo a). To join the chain install one piece through the inside face of chain and install the second piece through the outside of the other chain end. Engage the two pieces so that the link pins fit into the special link's plate holes (photo b).
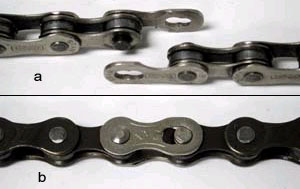
Then pull the chain to lock the link. The best way to do this is to place the chain on the chainring and pedal hard by hand to lock the special link. Be sure to inspect the special link before riding to ensure it's securely locked.
Note: Some special links are reusable, while others are disposable and should be replaced after each removal. Check the manufacturer's instructions or ask us to figure out which you have.
Type 3: Joined by any pin
There are several brands of chain that are installed and repaired by pressing out any pin partially, then re-pressing the same pin in to re-install/repair the chain. Check the instructions or ask us if you're not sure about your chain.
To join this type of chain, the pin must be in the position shown in the photo below, which is how they come from the factory. To join the ends of the chain, insert the roller end and then slightly flex the chain laterally to get the chain end with the pin to spread a bit wider. At this point you will be able to push and snap the roller end in place as the tip of the pin engages the hole in the roller.
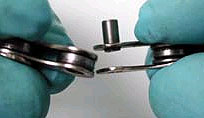
The next step is to press the pin into the chain with the chain tool. Push the pin far enough so it protrudes the same amount as neighboring pins.
Now that the chain is joined, check the connection for a tight link. It should pivot at the roller without resistance. If it binds, it may cause skipping and shifting problems. To free a stiff link, grasp the chain with your hands straddling the stiff link and flex the chain laterally, which will free the outer plates that got pinched during pin installation.
When the new chain is right you'll be able to pedal backwards by hand and the chain will run smoothly around the derailleur pulleys.
Repairing A Bent Chain
If you notice an intermittent skipping or roughness as you pedal, you may have bent a portion of your chain. This can happen if a stick gets grabbed by the drivetrain and you don't notice it and keep pedaling. To fix it, stop and find the bad section by backpedaling with your hand and watching for the bad links passing through the rear derailleur pulleys. They should stand out as they pass over the pulleys.
Pull back on the chain to get the bad spot where you can see it. To fix it, you'll need to hold the chain on either side of the bent link and twist. You can use your hands or pliers or whatever tools you have in your seat bag. With gentle pressure and a little trial and error you should be able to straighten the bent section enough to be able to ride without problems. It's a good idea to replace damaged links when you get home because they're weakened are more likely to break under load.
Repairing A Broken Chain
The most common cause of chain failure is an improperly installed pin, a common mistake when putting on a new chain. So, the best way to prevent chain breakage is to read and carefully follow the instructions for installing the different types of chains in this article.
To fix a broken chain, use your chain tool to remove the link that failed and then rejoin the chain ends with whatever method is available to you.
If you're carrying a special replacement pin or link in your seat bag, use it to reassemble the chain ends. Otherwise, trim the chain so there's a roller on one end and an outer plate with pin on the other. Join them by snapping the ends together and driving home the pin (more).
It's also possible to get home on a make-shift repair such as joining the chain with a piece of wire or even string, found on the road. You'll have to pedal carefully, but, with luck, it just might allow you to ride most of the way home.
Keep in mind that if you must remove links when repairing a chain, it shortens the chain and compromises shifting. So, as you ride home, avoid gears that approach the chain's full capacity, such as the large chainring/large cog combination. To prevent this problem consider carrying a section of spare links in your seat bag. Tip: If you had links left over when you sized your chain, save these: They're perfect for repairs.
We proudly use, carry and sell Park Tools. Park has been manufacturing bicycle-specific tools since 1963 and is currently the world’s largest bicycle tool manufacturer. A long-term dedication to quality, innovation, and customer service has made Park Tool the first choice of professional and home bicycle mechanics around the world. This article has been specially edited for us and includes information and photos provided courtesy of Park Tool USA.
No reproduction, in whole or in part, is permitted.
