How To Clean Your Chain And Drivetrain
Sick of those grease tattoos you get on your leg or pants every time you ride? Afraid to put your bike in the back of the car for fear you’ll slime the rich Corinthian leather? Dread fixing flats because it means dealing with the filthy chain? Tired of your riding pals telling you that you need to clean your bike?
Well, there’s a simple solution: clean your drivetrain and then keep it clean! And a cool tip for those calf tattoos: Try getting in the habit of removing your left foot from the pedal at stops instead of your right. Keeping your right foot on the pedal keeps your calf away from the chain!
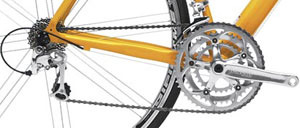
The photo shows the typical drivetrain on a road bicycle, city bike or mountain bike with multiple gears and derailleurs (the pedals are not shown, but you do not need to remove pedals to clean your drivetrain).
The things to keep clean are the chain, front and rear sprockets (called the "chainrings" and "cassette cogs" respectively) and the front and rear derailleurs (those parts that the chain passes through). All these parts can get grimy over time because the lubricant on them attracts dirt and gradually builds up creating a grimy mess.
The following steps are how to keep your drivetrain clean.
Recommended tools and supplies
- Repair stand or way to suspend the bike
- Rags
- Biodegradable solvent (or your favorite non-flammable type)
- Chain lubricant
- Ruler in inches
- Disposable gloves
- Eye protection (safety glasses)
- Small screwdriver
- Brush
- Chain-cleaner tool
- Chainring removal tool, such as a 5mm Allen wrench
Check the chain for wear
If you’ve logged mega miles, the chain may be worn out. If so, rather than cleaning, you should replace it. Chain replacement is not explained here. We're assuming that your chain only needs cleaning.
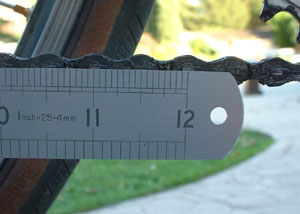
To check for chain wear, shift the chain onto the large chainring. Now, rest a ruler alongside the lower run of chain and see if you can measure exactly 12 inches between two pins (photo). If so, your drivetrain is okay.
If the second pin exceeds the 12-inch mark by 1/8 inch or more, your chain is worn out and should be replaced. Keep in mind that if you use a new chain with a worn cassette, you may experience "skipping" while pedaling, which could cause a crash.
This means you should replace the cassette, too. This is something we can help with if it turns out you need us to replace your chain.
Note that in the photo, although the chain is filthy, you can see that the pin lines up exactly with the foot mark (12 inches). This means that the chain is hardly worn at all and all that's needed is cleaning and lubing it.
Wipe the chain clean
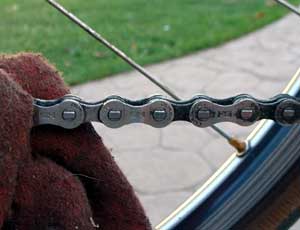
The easiest way to clean a chain is to put on some disposable gloves and wipe the links with a rag dampened in biodegradable solvent. As long as the chain isn’t really grimy, you’ll be able to wipe off the greasy mess (photo) with a few minutes of scrubbing.
Remember to clean both sides and the top and bottom of the chain. It's a little hard to get between the links, so watch what you're doing, take your time, and you'll be able to get every link shiny and clean again.
Some cyclists prefer not to buy solvent and instead simply clean their chain with their favorite chain lube. The lube will cut through the grime almost as well as the solvent.
The chain lube's advantage over solvent is that it will not remove all the lubricant on the chain or between the parts of the chain. Also, because some residue from the lube remains on the chain after wiping and cleaning, you don't need as much new lube before riding.
The drawback is that chain lube usually costs more than solvent. So it's slightly more costly to use it to clean and lube your chain in most cases.
Use a chain cleaner tool
A chain caked with sludge requires more drastic measures. You can put some solvent in a bucket, place this under the chain and brush the links to dissolve the grime (put on safety glasses to avoid any splashes getting in your eyes).
By dipping often, brushing and turning the pedals to move each section of links over the bucket, you can get the chain nice and clean all the way around. But, it can get messy, so take your time and don't rush.
When the chain is ready, wipe off the excess solvent. You don't want it on and inside the chain or it will act as a thinner to reduce the life of your lube when you put it on.
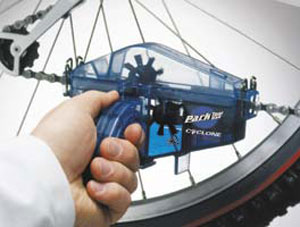
An easier way to do the same cleaning job on a grimy chain is to use a chain-cleaning tool, such as the one shown above by Park Tool. You fill it to the fill-line with solvent (you can also use lube if you prefer), snap it on the chain and pedal to brush the links clean (photo). This keeps the mess to a minimum making cleaning relatively easy.
However, these chain cleaners do cause the solvent/lube inside the tool to travel with the chain and this can mean some dripping. So be prepared with some rags beneath the chain on the floor. And be ready to wipe off drips from the other parts.
Clean the crankset
Lift the chain off the small chainring with your hand or the screwdriver, and rest it on the frame. Clean the inside and outside of the large chainring and the small chainring(s) with a rag.
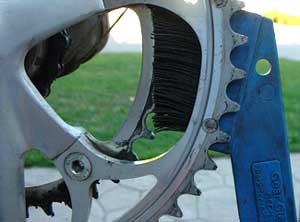
Knock off any grimy deposits on the nooks and crannies between the rings with a small screwdriver and then use a brush (photo) and the rag to clean off the rest. Look carefully from the outside and inside to find all the spots grime is hiding.
If the rings on your crankset are seriously gunked up with grime, it's usually easier to remove them from the crankarm and clean the rings individually off the bicycle (usually this can be done without removing the crankarm from the bicycle).
All this takes is the correct chainring bolt tool for your bicycle's crankset, usually a 5mm Allen wrench. We can supply this if you need one and it comes in handy for many other bicycle parts.
If you remove the chainrings, be sure to note how they were attached before taking them off. There's an outside and inside and a correct placement on the crankarm for both rings.
A simple way to get it right is to mark the rings and crankarm with tape so that there's only one way to put them back on to get them right. Remember how the chainring bolts go back together, too. You may want to take a photo for reference.
Clean the cassette
Remove the rear wheel and rest it on your workbench (or carefully on the ground), with the cassette facing up. There's no need to remove the quick release mechanism that holds the wheel on the bike.
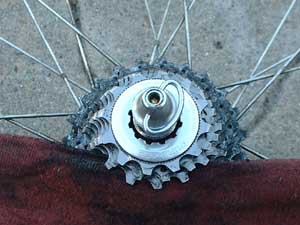
Dampen a rag with solvent or lube, and slip it between two cogs. Now, use a shoe-shine motion with the rag (photo) to clean the cogs.
This will rotate the cassette ensuring that you clean the cogs entirely all the way around. Then repeat with each pair of cogs until they’re all clean. Look in the valleys between all the teeth, too, since sometimes crud build-up hides there, too.
If there are any tough grimy deposits that refuse to come clean, apply a bit more lube and use the brush or the small screwdriver to break the crud off. When you're happy that all the cassette cogs are clean enough, move on to the next step (cleaning the derailleurs).
Then, reinstall the rear wheel (it's easier to clean the rear derailleur when the wheel is removed).
Clean the derailleurs
Inspect the pulleys on the rear derailleur and wipe off any built-up sludge (photo) on them, too. Pulleys are made of a tough nylon material that lasts a long time and will last the longest when kept clean.
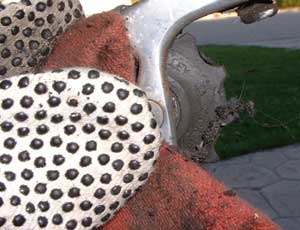
If the pulleys had a build-up of grime there's probably more in-between the pulley cage and on the rear derailleur. Run the rag through and over these parts to clean them, too.
Next run a rag through the front derailleur to clean it of any grimy deposits. The chain often bumps on the front derailleur cage and transfers grime to it. So wipe it fully and make it shine inside and out. If grime got inside the front derailleur body, poke the rag inside to clean the derailleur's workings so it shifts nice and smoothly.
Relube your drivetrain
As a last step, apply a little lube to your chain and derailleurs. One small drip on each link is enough for the chain and a light spritz on the derailleur pivot points will do the trick.
If you used lube to clean your drivetrain components, you won't need to apply as much lube as if you cleaned things with solvent. Your goal is to have a light film of lube on the chain and derailleurs, not any more.
Keep in mind that it's best to let the lube penetrate and dry for at least a few hours (overnight is best) before riding. That prevents the still-wet lube getting thrown off from pedaling. The lube can also get flung all over the rear wheel and frame if it hasn't been allowed to dry. You don't want that.
If you have any questions about bicycle drivetrain cleaning, the best tools or cleaners or lubes, or proper lubrication, be sure to give us a call or come in. We're always happy to help!
